This blog post is the first in a series of three blog posts. Obviously we talk about VPN and somehow we involve a device that runs OpenWrt. To be more clear on what exactly we’re trying to achieve by using which means, let’s elaborate our challenge and solution proposal thereof.
The big picture
We have “somebody” that likes to connect to a network from a remote location. That person will use a device such as a computer, laptop, tablet or mobile phone. Often throughout this blog post we will refer to this person as Road Warrior. The network that the road warrior wants to access can be a home or office network, but in either event is reachable via the public internet and it lives behind a router with a firewall. In this blog post we call that router a Gateway. In terms of virtual private network communication in such scenario we will assign the road warrior the role of an Initiator while the gateway serves as a Responder.
There might be many solutions to the challenge posted via the general setup as described above. We will solve it with a particular architecture and plan to employ the following components and methods:
- OpenWrt (as network router)
- strongSwan (as VPN responder)
- OSX / iOS (as VPN initiator)
- IKEv2 (for key exchange)
- EAP-TLS (for authentication)
This 3 Part tutorial will show how the complete setup and configuration on a step by step basis. In Part I (this part) we will show how to setup the VPN server and how to establish a simple connection from a client using a username/password authentication. In Part II we will show how to create certificates that are needed for EAP-TLS and in Part III we talk about site-to-site VPN.
Assumptions
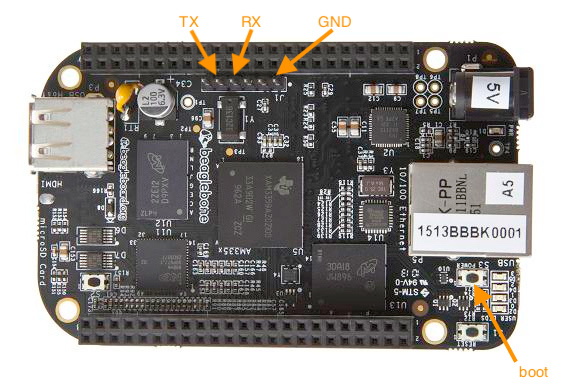
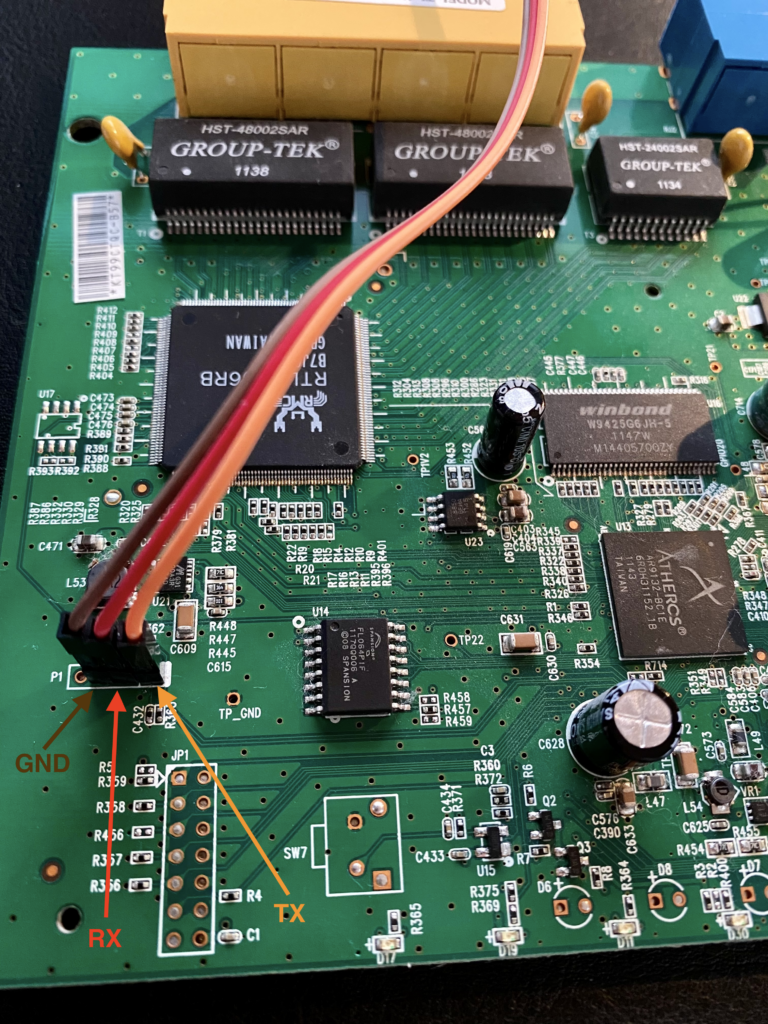
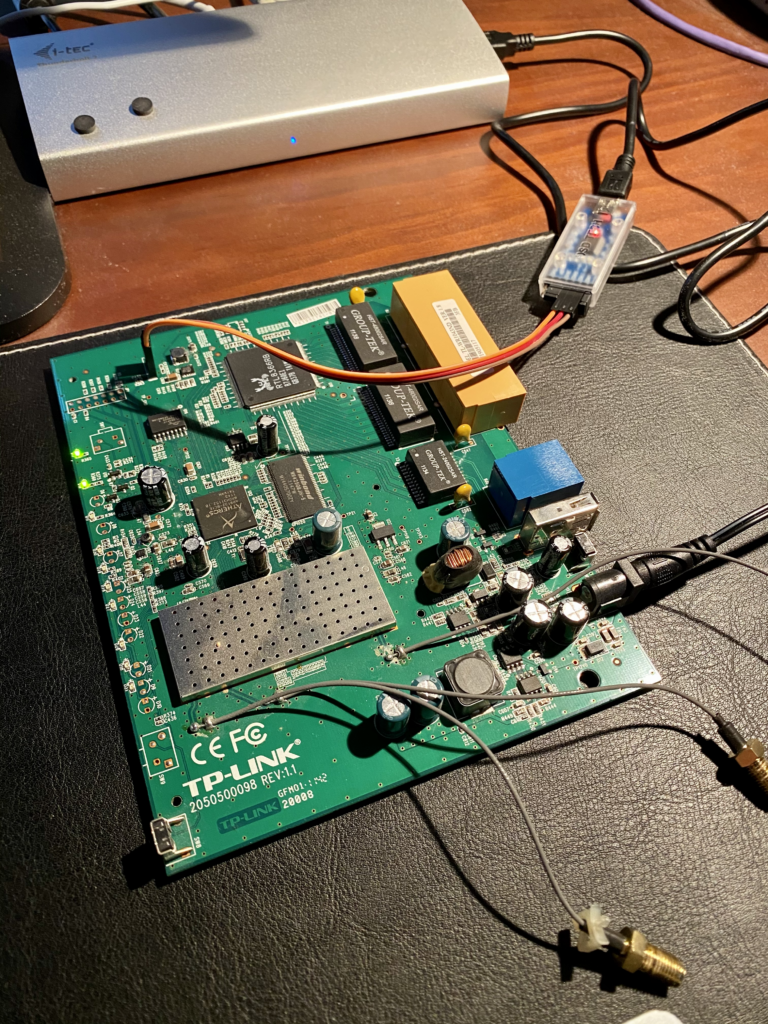
We will assume a moderate knowledge on OpenWrt and general networking. That said, we will not go into details on how to install OpenWrt onto a router and we will also not explain how to install a package onto an OpenWrt router or even how to custom build OpenWrt from scratch. If that should be a concern, please follow the instructions from the OpenWrt user guide or for more advanced topics please look up the developer guide.
Furthermore we assume the following network setup:
[user device] <---> [public internet] <---> [router] <---> [target network]
In our case we will use 2 different user devices. One user device will be a laptop running OSX and the other device will be a phone running IOS.
Devices running Windows, Android, Linux, etc., equally work without problems, but are not used as examples in our blog post.
Although we will ultimately use EAP-TLS for authentication, we will use EAP-MSCHAPv2 in the first part of our blog post. The main reason is that we try with a much simpler username/password authentication in a first step for easier debugging. Once that works, we can move on to the more complex client certificates.
Preconditions
In my case I decided to custom build OpenWrt for my specific router, because a custom build can yield a much smaller footprint. In my build configuration I selected the following packages to be built into the system.
CONFIG_PACKAGE_strongswan=y
CONFIG_PACKAGE_strongswan-charon=y
CONFIG_PACKAGE_strongswan-default=y
CONFIG_PACKAGE_strongswan-ipsec=y
CONFIG_PACKAGE_strongswan-libtls=y
CONFIG_PACKAGE_strongswan-mod-aes=y
CONFIG_PACKAGE_strongswan-mod-attr=y
CONFIG_PACKAGE_strongswan-mod-connmark=y
CONFIG_PACKAGE_strongswan-mod-constraints=y
CONFIG_PACKAGE_strongswan-mod-des=y
CONFIG_PACKAGE_strongswan-mod-dnskey=y
CONFIG_PACKAGE_strongswan-mod-eap-identity=y
CONFIG_PACKAGE_strongswan-mod-eap-mschapv2=y
CONFIG_PACKAGE_strongswan-mod-eap-tls=y
CONFIG_PACKAGE_strongswan-mod-fips-prf=y
CONFIG_PACKAGE_strongswan-mod-gmp=y
CONFIG_PACKAGE_strongswan-mod-hmac=y
CONFIG_PACKAGE_strongswan-mod-kernel-netlink=y
CONFIG_PACKAGE_strongswan-mod-md4=y
CONFIG_PACKAGE_strongswan-mod-md5=y
CONFIG_PACKAGE_strongswan-mod-nonce=y
CONFIG_PACKAGE_strongswan-mod-openssl=y
CONFIG_PACKAGE_strongswan-mod-pem=y
CONFIG_PACKAGE_strongswan-mod-pgp=y
CONFIG_PACKAGE_strongswan-mod-pkcs1=y
CONFIG_PACKAGE_strongswan-mod-pubkey=y
CONFIG_PACKAGE_strongswan-mod-random=y
CONFIG_PACKAGE_strongswan-mod-rc2=y
CONFIG_PACKAGE_strongswan-mod-resolve=y
CONFIG_PACKAGE_strongswan-mod-revocation=y
CONFIG_PACKAGE_strongswan-mod-sha1=y
CONFIG_PACKAGE_strongswan-mod-sha2=y
CONFIG_PACKAGE_strongswan-mod-socket-default=y
CONFIG_PACKAGE_strongswan-mod-sshkey=y
CONFIG_PACKAGE_strongswan-mod-stroke=y
CONFIG_PACKAGE_strongswan-mod-updown=y
CONFIG_PACKAGE_strongswan-mod-x509=y
CONFIG_PACKAGE_strongswan-mod-xauth-generic=y
CONFIG_PACKAGE_strongswan-mod-xcbc=y
CONFIG_PACKAGE_strongswan-pki=y
Note that there are other packages that these packages might depend on. As explanations in custom building OpenWrt is not the scope of this blog post, please make sure all dependencies are satisfied (i.e. use make menuconfig to automatically resolve dependencies).
You don’t have to custom build, but can use an off-the-shelf OpenWrt image and simply install the strongSwan packages listed above.
The target network is one of potentially many networks that are routed by the router. In our case we have a network called lab, that is separated from other networks. We want road warriors to be able to get to the lab network.
Network setup
Understanding our configuration later on requires to understand our network setup on the router in the first place. In our setup we have 3 networks, all of which have an active DHCP server that hands out ip addresses to clients.
        Main Network: [10.10.10.0/24]
Road Warrior Network: [10.10.97.0/28]
         Lab Network: [10.10.90.0/24]
The main network is the default network that would also exist if there would be only one network setup. Assuming we have a home network, this is where your computers and laptops go. Devices in this network are generally trusted and allowed to see each other. Also, the main network most likely will have a route to the internet as well as all other networks configured. In our case the main network is connected to all lan ports of the router and which ever device that plugs into the router via cable will get an ip address in the main network.
The road warrior network only serves one purpose, that is to assign an ip address to incoming road warriors. Road warriors might be allowed to see each other – or not – depending on your preference. Also, the firewall as well as the ipsec settings will determine into which other networks road warriors are allowed to get into them. In our case we will allow road warriors to access the lab network, but deny them the main network. Also we will allow road warriors to see each other.
The lab network is an isolated network that may host a couple of servers and some clients. Either way, the lab network doesn’t route into the main network but might have internet access. In our case the lab network cannot go anywhere and it is isolated from the rest of the world.
strongSwan configuration
More or less there are 3 different configuration files that we need to adopt. Let’s start with the easiest modification.
/etc/strongswan.d/charon/attr.conf
In this file we need to add 2 lines for DNS. We make use of two different IKEv2 configuration payload attribute types in order to tell incoming road warrior which DNS server to use for our target network(s). The ip address 10.10.97.1, that points to the DNS server of the road warrior network, is declared in line 5 by using attribute type 3 (INTERNAL_IP4_DNS). The domain name of our local network, for which our internal DNS server should be used, is declared in line 6 by using attribute type 25 (INTERNAL_DNS_DOMAIN).
In summary, the road warrior network gateway assumes the DNS server function in our setup and we tell road warriors that connect via VPN to submit all DNS queries that match our domain (locallab.home) to it.
attr {
    3  = 10.10.97.1
    25 = locallab.home
    load = yes
}
/etc/ipsec.secrets
In the first line we declare the type and name of the private key for the server certificate that will be offered to VPN clients as part of the key exchange. The key is in a file named servercert.key.pem and should be treated as an RSA key. The key has no password. The key is located in the default folder for private keys that strongSwan looks into – in our case /etc/ipsec.d/private, thus the full path to the key is /etc/ipsec.d/private/servercert.key.pem. The second line defines a user by the name of myuser with the password mypassword.
: RSA servercert.key.pem
myuser : EAP "mypassword"
/etc/ipsec.conf
Line 1 declares a section for general configuration parameters. We don’t have any of those, so we leave the block empty in our config.
Line 3 declares the default configuration parameter block that all specific connections (i.e. also our connection in line 16) will inherit from. Let’s look at every line in that block in more detail:
Line 4 says that we want to use an ikev2 key exchange. In line 5 we define the cipher suites to be used for our IKE and ISAKMP security associations and in line 6 we do the same for ESP.
Before we continue to the next line, we need to understand the concept of left and right parameters for strongSwan. In easy words, we do have two communication partners and thus 2 sides of our communication. More or less you can think of the left side of the local side and the right side of the remote side. The config below is for our VPN responder and we do consider it the local config in this context. That’s why ‘left’ parameters refer to the settings on our OpenWrt router.
Line 7 defines the public network interface for our router. We don’t have a static ip address, so we leave it as %any4, which signifies an IPv4 address to be filled in during negotiation.
Line 8 defines that our router will be authenticated via public key cryptography – or in layman’s terms: our router will present a server certificate to the client.
Line 9 defines the file name of the server certificate.
Line 10 specifies how the server (our router) should be identified for authentication. We will talk about certificates in Part II, so for now we leave it like that.
Line 11 specifies the public ip address for our road warriors. At this point we don’t know from where they’re coming, so we do not impose filters such as a specific geographic ip address regions or domain names. We exclude IPv6 addresses and limit our road warriors to use IPv4 addresses only.
Line 12 specifies the ip address to be used in a tunnel for the road warrior. We define a pool of addresses in the small subnet 10.10.97.0/29. We exclude the first host address (10.10.97.1) as it would collide with the gateway. We also exclude the broadcast address (10.10.97.7). In summary a road warrior will be assigned one ip address between 10.10.97.2 and 10.10.97.6.
Line 13 defines the identity a client uses to reply to an EAP Identity request. In our case we set it to %identity and by that indicate to the EAP identity method that during EAP authentication the client should be asked to provide an EAP identity.
Line 14 tells the IPSec daemon to load this configuration automatically during startup via the add parameter. In other scenarios such as site-to-site VPN tunnels we could use start as a parameter and that way tell the IPSec daemon to immediately start establish the VPN tunnel upon daemon initialization.
Line 16 starts a new configuration block that contains all the settings for our specific connection which we arbitrary name rwMSCHAPV2.
In line 17 we tell the IPSec daemon that incoming road warriors should always (as in automatically) be sent our server certificate. Although part of IKEv2 would be for the client to ask for the certificate explicitly, some clients don’t ask and just expect the certificate, which is why we set it up like that.
In line 18 we define to which subnets the incoming road warrior should gain access to. If we would define 0.0.0.0/0 here, our road warriors would send all traffic through the VPN tunnel and thus our router. What we want is a so called split-tunnel, hence we provide a comma separated list of sub networks which a road warrior should route through the VPN tunnel. Note that the road warrior subnet itself includes all 6 possible hosts. We excluded the gateway (10.10.97.1) from the road warrior address pool but we include it in the routing table for the road warrior. Otherwise road warriors would not be able to route traffic in that subnet.
In line 19 we define the identity that a client must use for authentication. For a username/password authentication the identity can be almost any string, as long as it matches responder and initiator configuration. In other authentication mechanisms (i.e. eap-tls the identity must be confirmed via certificate).
Finally, line 20 defines that this connection shall employ MSCHAPv2 as authentication method. Again, other methods such as pubkey or eap-tls could be used instead, but are not in scope of Part I (this part) of the blog post.
config setup

conn %default
        keyexchange=ikev2
        ike=aes256-aes128-sha256-sha1-modp3072-modp2048
        esp=aes128-aes256-sha256-modp3072-modp2048,aes128-aes256-sha256
        left=%any4
        leftauth=pubkey
        leftcert=servercert.cert.pem
        leftid=vpn.example.com
        right=%any4
        rightsourceip=10.10.97.2-10.10.97.6
        eap_identity=%identity
        auto=add

conn rwMSCHAPV2
        leftsendcert=always
        leftsubnet=10.10.97.0/29,10.10.90.0/24
        rightid=vpn-via-mschapv2
        rightauth=eap-mschapv2
Network configuration
Obviously we need to configure 2 extra networks – one for our road warriors and another one as our target.
/etc/config/network
We add 2 new interfaces, which we both declare as a virtual lan.
The vpn interface will point to VLAN 97 and be defined as a 29 bit network, which provides for a total of 6 hosts. That number will be more than enough as a) our home network will not have more than 2 or 3 parallel VPN tunnels established concurrently and b) the hardware we’re using will not have enough computing power for the cryptographic operations needed to sustain 10s of VPN tunnels at the same time.
The lab interface will point to VLAN 90 and be defined as a 24 bit network, which provides for a total of 254 hosts. I doubt we will have that many hosts connected at home, but we don’t need to limit the amount of supported hosts for performance reasons either.
config interface 'vpn'
        option stp '1'
        option type 'bridge'
        option ifname 'eth0.97'
        option proto 'static'
        option ipaddr '10.10.97.1'
        option netmask '255.255.255.248'
        option delegate '0'

config interface 'lab'
        option stp '1'
        option type 'bridge'
        option ifname 'eth0.90'
        option proto 'static'
        option ipaddr '10.10.90.1'
        option netmask '255.255.255.0'
        option delegate '0'
/etc/config/dhcp
We add 2 dhcp configuration blocks. The first block is for our vpn network and we define that no DHCP server should be started in that network, as IPSec takes care of assigning IP addresses to road warriors. The second block defines a DHCP server for our lab network.
config dhcp 'vpn'
        option interface 'vpn'
        option ignore '1'

config dhcp 'lab'
        option start '100'
        option leasetime '12h'
        option limit '150'
        option interface 'lab'
Firewall configuration
Having IPSec setup is not enough, as road warriors will bounce at the firewall before even getting to the IPSec daemon. Again, there are 3 configuration files that we need to adopt to get the firewall in order.
/etc/config/firewall
We have to add a number of blocks into the existing firewall configuration. The brief summary is as follows:
We create 2 new zones – one for our vpn network and another one for the lab network (lines 1-13). We allow traffic from our vpn zone to be forwarded to the lab zone (lines 14-16). We add 4 rules that open up our wan zone for incoming VPN connections.
config zone
        option name             vpn
        list network            'vpn'
        option input            ACCEPT
        option output           ACCEPT
        option forward          ACCEPT

config zone
        option name             lab
        list network            'lab'
        option input            ACCEPT
        option output           ACCEPT
        option forward          REJECT

config forwarding
        option src              vpn
        option dest             lab

config rule
        option name             Allow-IPSec-ESP
        option src              wan
        option proto            esp
        option target           ACCEPT

config rule
        option name             Allow-ISAKMP
        option src              wan
        option dest_port        500
        option proto            udp
        option target           ACCEPT

config rule
        option name             Allow-IPSec-NAT
        option src              wan
        option dest_port        4500
        option proto            udp
        option target           ACCEPT

config rule
        option name             Allow-IPSec-AH
        option src              wan
        option proto            ah
        option target           ACCEPT
/etc/firewall.user
We have to accept input, forward and output traffic originated from and directed to clients matching an IPsec policy. If we want to be able to reach or ping road warriors, we need the rule in line 5, as it exempts traffic that matches an IPsec policy from being NAT-ed before tunneling. Optionally, we can setup NAT (or SNAT) as shown in line 6 in order for our road warriors to be able to access the internet.
iptables -I INPUT  -m policy --dir in --pol ipsec --proto esp -j ACCEPT
iptables -I FORWARD  -m policy --dir in --pol ipsec --proto esp -j ACCEPT
iptables -I FORWARD  -m policy --dir out --pol ipsec --proto esp -j ACCEPT
iptables -I OUTPUT   -m policy --dir out --pol ipsec --proto esp -j ACCEPT
iptables -t nat -I POSTROUTING -m policy --pol ipsec --dir out -j ACCEPT
iptables -t nat -I POSTROUTING -s 10.10.97.0/29 -o wan -j MASQUERADE
Putting it all together
First of all, let’s have a quick look again at all the files that we’ve had to create or modify in order to get our setup done. Please note that there might be other directories that would fall into the tree structure shown below, but for easier reading all those are not listed. Below only shows those directories and files we had to modify. Also, in this part of the blog post we will not talk about the certificates, but we will magically assume those to be in place and correctly setup. We will talk about certificates in Part II.
└── etc
    ├── config
    │   ├── dhcp
    │   ├── firewall
    │   └── network
    ├── firewall.user
    ├── ipsec.conf
    ├── ipsec.d
    │   ├── cacerts
    │   │   ├── rootca.pem
    │   │   └── intermediateca.pem
    │   ├── certs
    │   │   └── servercert.cert.pem
    │   └── private
    │       └── servercert.key.pem
    ├── ipsec.secrets
    └── strongswan.d
        └── charon
            └── attr.conf
IPSec Status
The first thing we do is to login to our router on a local interface via ssh (or alternatively a serial console). The IPSec daemon should be started automatically upon boot, otherwise a quick /etc/init.d/ipsec start command will do the trick. Time to use the ipsec statusall command to see what’s going on.
root@OpenWrt:~# ipsec statusall
Status of IKE charon daemon (strongSwan 5.8.2, Linux 4.14.209, mips):
  uptime: 84 seconds, since Jan 01 19:10:14 2021
  worker threads: 11 of 16 idle, 5/0/0/0 working, job queue: 0/0/0/0, scheduled: 0
  loaded plugins: charon aes des rc2 sha2 sha1 md4 md5 random nonce x509 revocation constraints pubkey pkcs1 pgp dnskey sshkey pem openssl fips-prf gmp xcbc hmac attr kernel-netlink resolve socket-default connmark stroke updown eap-identity eap-mschapv2 eap-tls xauth-generic
Virtual IP pools (size/online/offline):
  10.10.97.2-10.10.97.6: 5/0/0
Listening IP addresses:
  10.10.10.1
  10.10.90.1
  10.10.97.1
  xxx.xxx.xxx.xxx
Connections:
  rwMSCHAPV2:  %any4...%any4  IKEv2
  rwMSCHAPV2:   local:  [vpn.example.com] uses public key authentication
  rwMSCHAPV2:    cert:  "C=DE, ST=Saxony, L=Dresden, STREET=Musterstrasse 1, 01234 Dresden, Germany, O=Tinkivity, OU=vpn gateways via manual vpngate-prov, CN=vpn.example.com"
  rwMSCHAPV2:   remote: [vpn-via-mschapv2] uses EAP_MSCHAPV2 authentication with EAP identity '%any'
  rwMSCHAPV2:   child:  10.10.97.0/29 10.10.90.0/24 192.168.1.0/24 === dynamic TUNNEL
Security Associations (0 up, 0 connecting):
  none
Based on a good understanding of the configuration discussed in this blog post so far, most of the lines shown in the status should start to make real sense now. Line 12 is special, as it will not show triple-x pairs in reality, but show the public ip address of your wan port on your router.
Client configuration
Let’s use OSX’s build in network manager to configure a new VPN. Go to System Preferences –> Network and click the + (plus sign) button to configure a new VPN connection. Select VPN from the drop down list of interfaces and create a service as follows:
   Interface: VPN
    VPN Type: IKEv2
Service Name: myFirstVPN
Click the Create button and you will see a new connection that awaits some more configuration. Please key in the following values:
Server Address: xxx.xxx.xxx.xxx
     Remote ID: vpn.example.com
      Local ID: vpn-via-mschapv2
For the server address you can either type in the public ip address (if it doesn’t change in the next 5 minutes) or a fully qualified domain name (if you have dynamic DNS setup). The Remote ID and the Local ID should ring a bell for you, as it will match leftid and rightid from the /etc/ipsec.conf we have setup earlier. Finally, you will need to click on the Authentication Settings button to open a popup menu where you type in the following values:
Authentication Settings: Username
               Username: myuser
               Password: mypassword
Username and password will obviously match our configuration in /etc/ipsec.secrets.
Making a Connection
As soon as you click that Connect button, you should get a connection. If you still have your local console on the router you can tail the router log via the following command for good debugging:
root@OpenWrt:~# logread && logread -f
Once you have successfully established a connection, you should run the ipsec statusall command again and check out what is different now.
root@OpenWrt:~# ipsec statusall
Status of IKE charon daemon (strongSwan 5.8.2, Linux 4.14.209, mips):
  uptime: 99 seconds, since Jan 01 19:10:29 2021
  worker threads: 11 of 16 idle, 5/0/0/0 working, job queue: 0/0/0/0, scheduled: 0
  loaded plugins: charon aes des rc2 sha2 sha1 md4 md5 random nonce x509 revocation constraints pubkey pkcs1 pgp dnskey sshkey pem openssl fips-prf gmp xcbc hmac attr kernel-netlink resolve socket-default connmark stroke updown eap-identity eap-mschapv2 eap-tls xauth-generic
Virtual IP pools (size/online/offline):
  10.10.97.2-10.10.97.6: 5/0/0
Listening IP addresses:
  10.10.10.1
  10.10.90.1
  10.10.97.1
  xxx.xxx.xxx.xxx
Connections:
  rwMSCHAPV2:  %any4...%any4  IKEv2
  rwMSCHAPV2:   local:  [vpn.example.com] uses public key authentication
  rwMSCHAPV2:    cert:  "C=DE, ST=Saxony, L=Dresden, STREET=Musterstrasse 1, 01234 Dresden, Germany, O=Tinkivity, OU=vpn gateways via manual vpngate-prov, CN=vpn.example.com"
  rwMSCHAPV2:   remote: [vpn-via-mschapv2] uses EAP_MSCHAPV2 authentication with EAP identity '%any'
  rwMSCHAPV2:   child:  10.10.97.0/29 10.10.90.0/24 192.168.1.0/24 === dynamic TUNNEL
Security Associations (1 up, 0 connecting):
  rwMSCHAPV2[1]: ESTABLISHED 2 seconds ago, xxx.xxx.xxx.xxx[vpn.example.com]...192.168.0.2[vpn-via-mschapv2]
  rwMSCHAPV2[1]: Remote EAP identity: ding
  rwMSCHAPV2[1]: IKEv2 SPIs: 91b67839639696d2_i 04224a0ddb30a1e2_r*, public key reauthentication in 2 hours
  rwMSCHAPV2[1]: IKE proposal: AES_CBC_256/HMAC_SHA2_256_128/PRF_HMAC_SHA2_256/MODP_2048
  rwMSCHAPV2{1}:  INSTALLED, TUNNEL, reqid 1, ESP SPIs: cfff2908_i 0dfa6773_o
  rwMSCHAPV2{1}:  AES_CBC_256/HMAC_SHA2_256_128, 1097 bytes_i (8 pkts, 3s ago), 289 bytes_o (4 pkts, 3s ago), rekeying in 48 minutes
  rwMSCHAPV2{1}:   10.10.90.0/24 10.10.97.0/29 === 10.10.97.2/32
Congratulations – that’s it. In the next part of this blog post we will look at the certificates in more detail.